Vehicle Penetration Guide
Where to shoot enemy armor - weak points and damage zones for all vehicles
Ultimate Armored Vehicle Guide
Welcome to the comprehensive armored vehicle guide for Squad. This guide covers vehicle basics, gameplay strategies, and detailed breakdowns of every MBT, MGS, and IFV in the game.
Abbreviations
| Term | Meaning |
|---|---|
| MBT | Main Battle Tank |
| MGS | Mobile Gun System |
| IFV | Infantry Fighting Vehicle |
| APC | Armoured Personnel Carrier |
| AR | Ammo Rack |
| HTK | Hits to Kill |
Important Mechanics
Before diving into specific vehicles, understand these critical mechanics:
Hull vs Component Damage
Hull and component damage are different types. The vehicle only explodes when hull HP OR ammo rack HP reaches zero. When the ammo rack hits 0 HP, a 30-second cook-off animation starts - it only stops early if hull HP reaches zero first.
Armor Angles
Armor values don’t affect damage directly - they only determine what penetrates and component damage. Angles matter significantly when fighting tanks or at long range. Test mechanics at squad-armor.com.
Component Targeting
You cannot damage engine and ammo rack simultaneously. Tracks can be pierced along with other components, but damage splits between them.
General Tips
- You don’t need to stay up front if it gives you no advantage
- Shoot helicopters and supplies with Explosive rounds
- All tanks have 3000 HP with 2000 HP ammo racks
Color Legend
- 🟢 Green boxes = Engine / optimal hit zone
- 🔴 Red boxes = Ammo Rack
- ⬛ Black boxes = Avoid (no pen or minimal damage)
About TOWs
Wire Guided (BGM61, Konkurs, HJ-73C, AT-3 Malyutka, HJ-8, F2 MILAN)
- Better for moving targets
- Cannot move while shooting
Laser Guided (Kornet, Bastion, Refleks)
- Better for long range
- Can be countered by smokes
Faction Colors
- 🔵 BLUFOR - UK, US, CAN, AUS
- 🟡 PAC - CN (China)
- 🔴 REDFOR - RU (Russia)
- 🟢 INDEP - MEA, TR, IMF, INS, PMC
Tier Lists
MBT Tier List (v8.0)
| Tier | Tanks |
|---|---|
| S | ZTZ-99 |
| A | M1A2/1 Abrams, T-90 |
| B | T-72 |
| C | Challenger 2, Leopard 2, M60T |
| D | M1128, Sprut, ZTD-05, T-62 |
IFV Tier List (v7.x)
| Tier | Vehicles |
|---|---|
| S | Bradley |
| A | M1128, Sprut, ZTD-05, HJ-73C variants |
| B | BMP-2, ZBD-04, FV510 |
| C | BMD-4, LAV 6, ASLAV, ACV-15, BTR-82 |
| D | LAV-25, Coyote, MTLB-6M, PARS III, FV107, M1125, AAVP |
| E | BMP-1, BMD-1, LAV III, Bulldog |
A tier list reflects personal ranking shaped by preferences and experience. Different perspectives exist - disagree if you want, but bring solid points.
Main Battle Tanks
All MBTs have 3000 HP hull and 2000 HP ammo racks.
🔵 Challenger 2 (British)
Type: ☕ Defensive Tank
Engagement Difficulty: ⭐⭐ (Easy)
Front (2 HTK): It’s a shoebox with an exposed ammo rack. Aim anywhere in the middle except the black boxes. Be careful fighting at distance as shots can non-pen often.
Side (2 HTK): Same pattern as the ZTZ - aim at track height for an ammo rack and track hit.
🛡️ Defending: Good luck. Play more passive with good positioning. You can angle your front to mislead gunners into aiming at the window or causing ricochets off the angled track.
🔵 Leopard 2 (Canada)
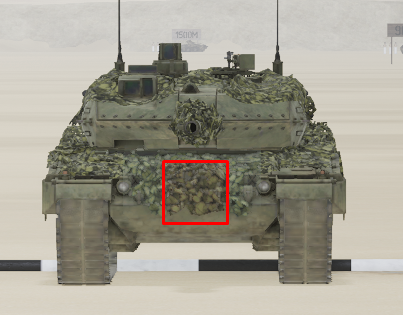
Type: 🍁 Defensive Tank
Engagement Difficulty: ⭐⭐ (Easy)
Front (2 HTK): Another shoebox with an exposed ammo rack. Aim at the lower right section to secure a 2 HTK.
Side (2 HTK): Take care when aiming - the ammo rack is pretty small.
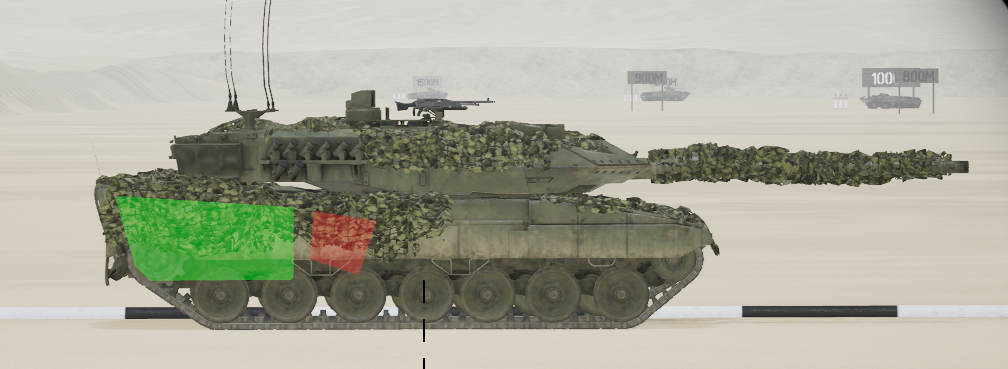
🛡️ Defending: Another MBT you need to play carefully. Avoid frontal engagements, rely on information and good positioning.
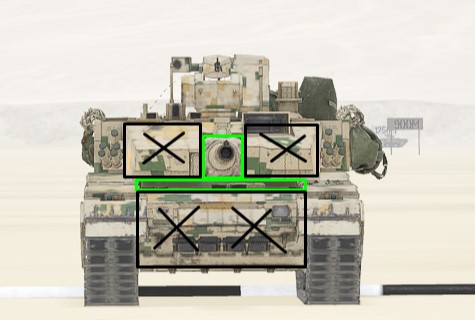
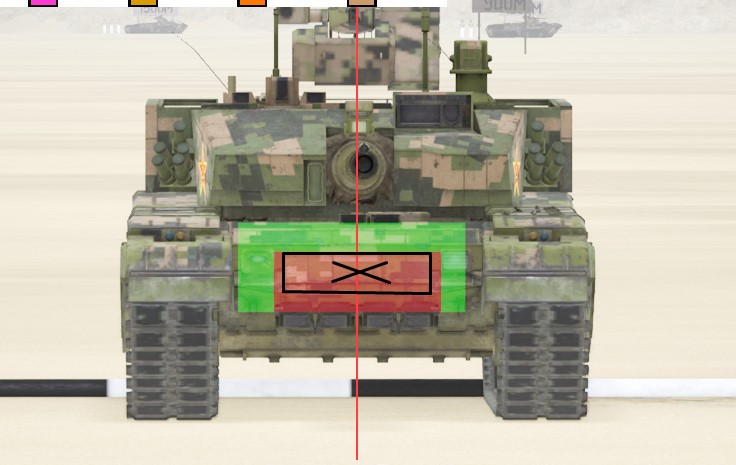
🔵 M1A2/1 Abrams (USA/Australia)
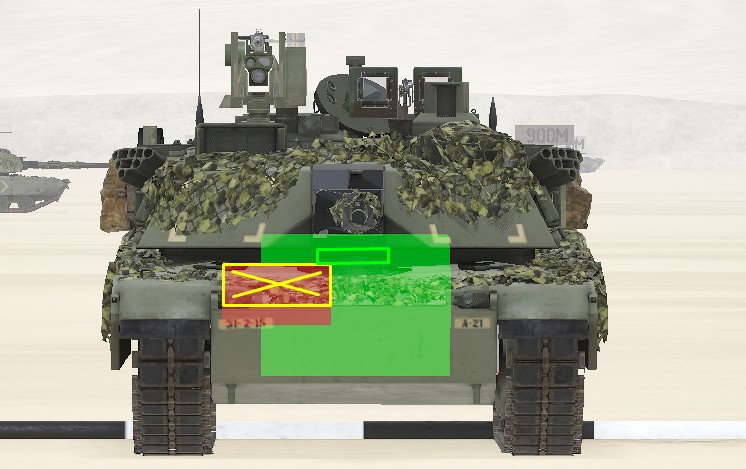
Type: 🦅 Offensive Tank 🦘
Engagement Difficulty: ⭐⭐⭐⭐ (Hard)
Front (4-2 HTK): A beast when it comes to tanking. Can be killed with 4 shots to the neck/mantle, or you can TRY to hit the ammo rack - but it’s very difficult as hitting the upper part causes a non-pen.
Side (2 HTK): Careful - this is one of the slimmest ammo racks. Aim precisely for AR + track hit.
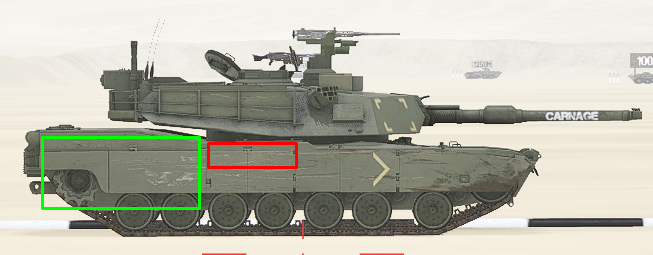
🛡️ Defending: A tank you can be aggressive with. You’ll win most trades in frontal engagements.
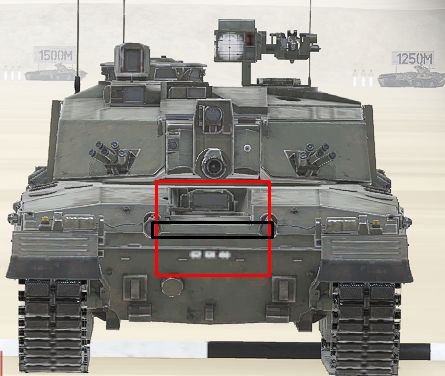
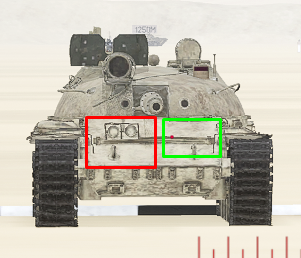
🟡 ZTZ-99 (China)
Type: 🐉 Offensive Tank - THE GOAT
Engagement Difficulty: ⭐⭐⭐⭐⭐ (Very Hard)
Front (4 HTK): PRAY for your life. This beast can only be damaged on its turret. Disabling the track won’t do damage, and you can’t hit engine or ammo rack from the front.
Side (2 HTK): Aim below the turret at track height to damage both track and ammo rack.
🛡️ Defending: No fear in this war machine. Face the enemy tank with your front and angle to hide the neck if possible. Also equipped with TOW.
⚠️ Be careful against USA - experienced Bradley crews can 1 HTK your ammo rack from the front!
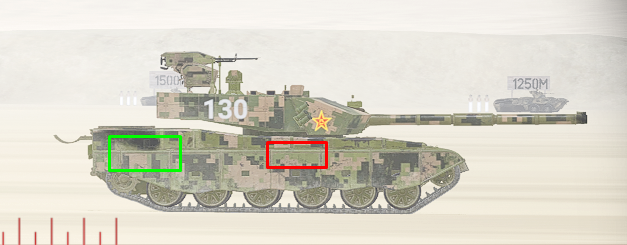
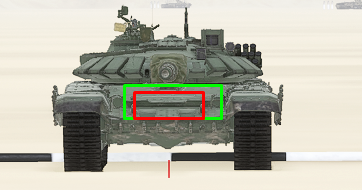
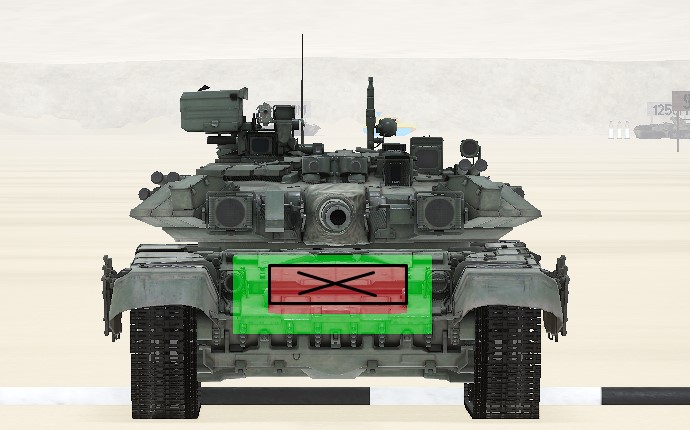
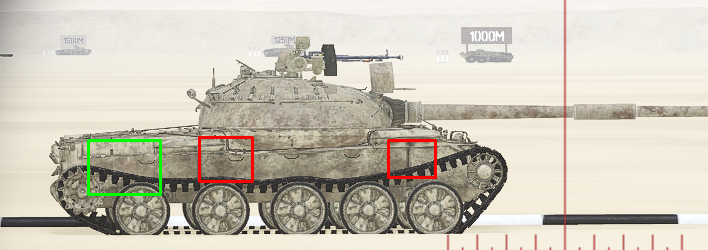
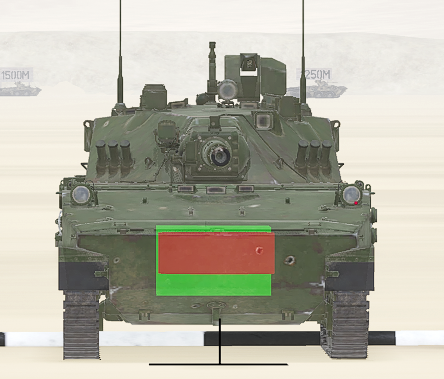
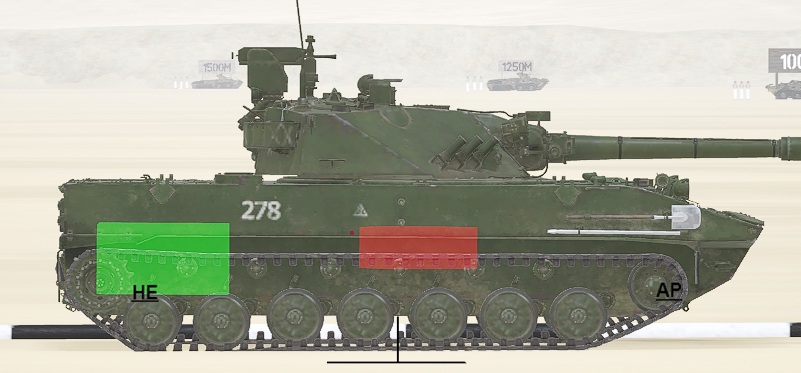
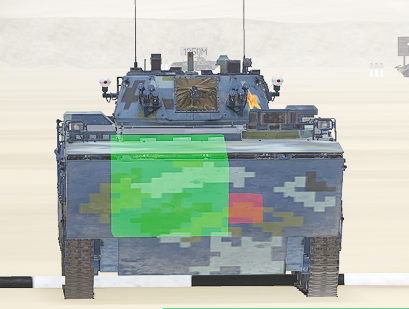
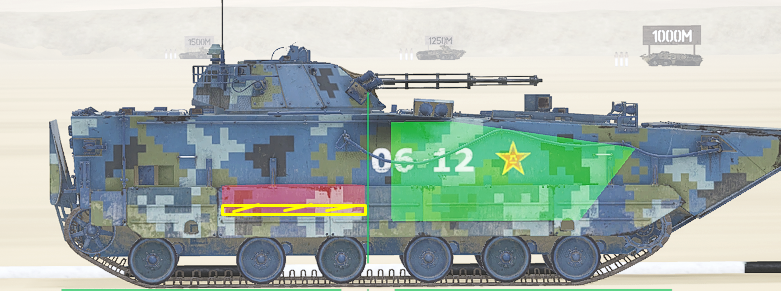
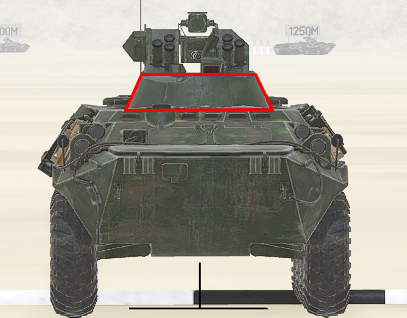
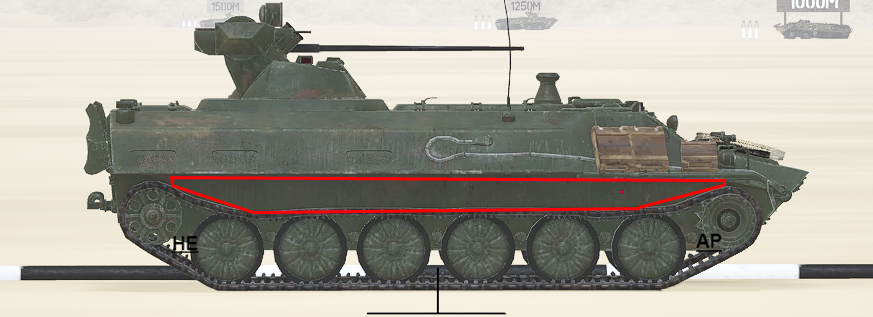
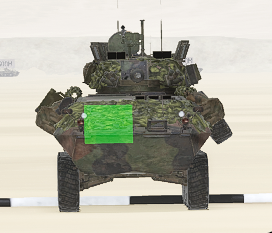
🔴 T-72/S (Russia/MEA)
Type: 🐻 Hybrid Tank 🐪
Engagement Difficulty: ⭐⭐⭐ (Medium)
Front (2 HTK): Can be easy to take down at the right angle. Big and exposed ammo rack in the middle section.
Side (2 HTK): Ammo rack is right in the middle of the turret. Can be shot for AR + track damage.

🛡️ Defending: You can be aggressive and win most trades in frontal engagements since you have TOWs in your favor. After the TOW rework and the new T-90, play more passively against better factions (RU/US/CN) and be aggressive against others.
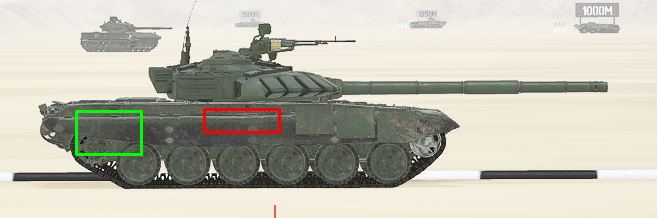
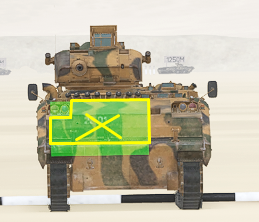
🔴 T-90 (Russia)
Type: 🐻 Offensive Tank
Engagement Difficulty: ⭐⭐⭐⭐ (Hard)
Front (4-2 HTK): This new piece of Russian armor can be a pain for existing MBTs. The upgraded frontal armor protects most of the ammo rack, leaving only a thin unreliable line to hit.
Side (2 HTK): Ammo rack in turret middle - SAME AS T-72.
🛡️ Defending: A worthy opponent for the Abrams and ZTZ. Can be aggressive and win trades with good positioning or first shot advantage.
🟢 M60T (Turkey/PMC)

Type: 🕌 Defensive Tank
Engagement Difficulty: ⭐⭐ (Easy)
Front (2 HTK): Easy 2-shot ammo rack kill. Go for it in a stronger MBT.
Side (2 HTK): Consistent and easy to hit ammo rack.
🛡️ Defending: Avoid frontal confrontations and play on information with this tin box. Note: The “High Explosive” ammo is actually fragmentation.
🟢 T-62 (Insurgents/Militia)
Type: Meme MBT
Engagement Difficulty: ⭐ (Very Easy)
Front (2 HTK): This is a meme MBT - huge ammo rack, no armor whatsoever.
Side (2 HTK): An ammo rack buffet. Just pick your favorite spot.
⚠️ Warning: T-62 AP rounds have less penetration than other MBTs!
Mobile Gun Systems (MGS)
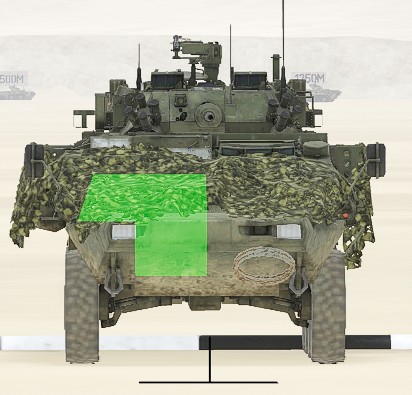
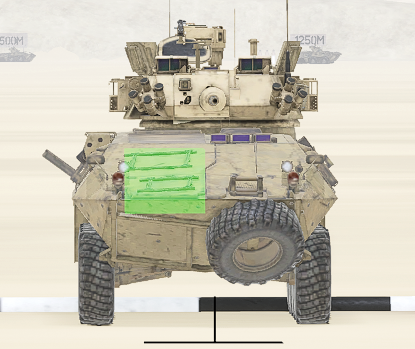
The Sprut, ZTD-05, and M1128 are Mobile Gun Systems equipped with 105mm cannons. They can damage most MBT mantles and side/rear armor.
Role: Long-range MBT hunters. Treat them like IFVs - weak armor, 2 HTK by any MBT.
Can penetrate front armor of: Leopard, Challenger, T-62, T-72 Limited to mantle/neck hits on: M1A2/1, ZTZ
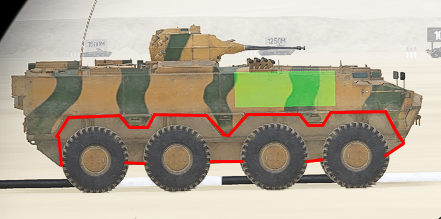
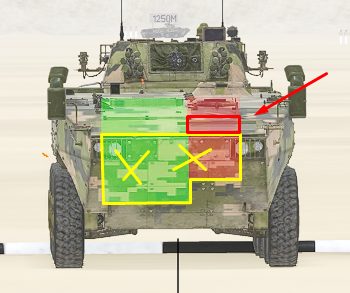
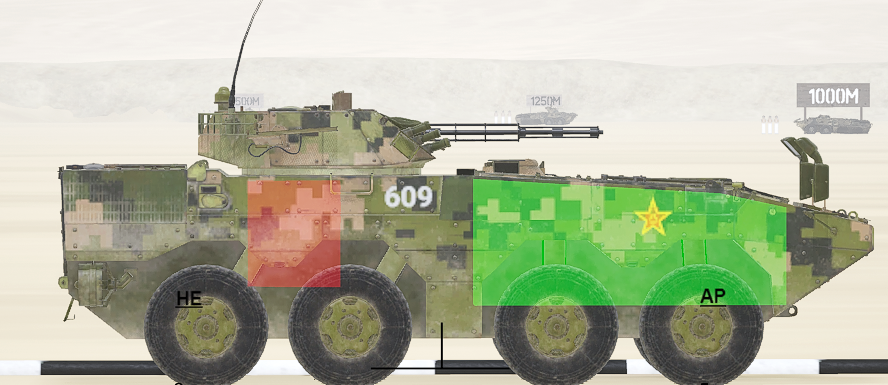
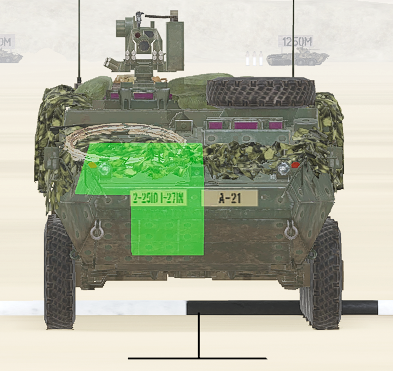
🔵 M1128 Stryker MGS (USA)

HP: 1250
The first BLUFOR MGS. Equipped with powerful weapons and wheeled for great movement speed.
⚔️ Fighting as: Zoom through the map and hunt down armored vehicles. Information is key. Hide your ammo rack behind the big engine.
🛡️ Fighting against: Slippery and hard to catch. In frontal engagement, aim for the right side to hit the ammo rack. Otherwise, disable engine and target hull.
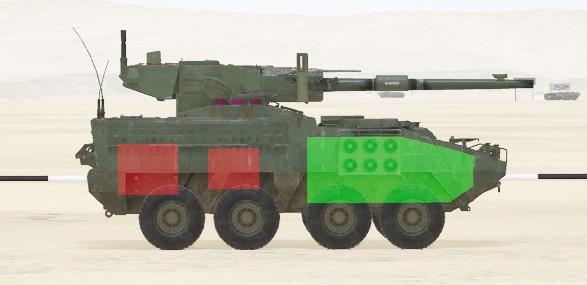
Stronger than: MTLB-6MB, BMP-1, BMP-2, BTR-82, ZBD-04, ACV-15, PARS III Equal to: ZTD-05, Sprut Weaker than: All tanks
🟡 ZTD-05 (China Navy)

HP: 1250
One of the first MGS. Uses powerful weapons and mobility to take down armor.
⚠️ Debuff: Same as T-62 - can only penetrate up to 550mm!
⚔️ Fighting as: Stay away from close combat. Hide your ammo rack by putting your engine in front of it.
🛡️ Fighting against: Hit the ammo rack from the front if static. Otherwise, aim for engine and disable the gun while flanking. On the side, aim above the tracks.
Stronger than: FV107, Coyote, LAV III, Stryker, AAVP, LAV-25, ASLAV, LAV 6, FV510 Equal to: M1128, Sprut Weaker than: Tanks, Bradley
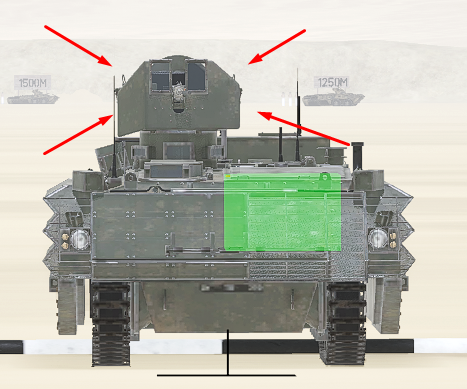
🔴 Sprut-SD (Russia VDV)
HP: 1250
Same function as ZTD-05 with improved weapons but weaker armor.
⚔️ Fighting as: Play carefully with information. You can take down IFVs and tanks, but they can kill you quickly too. Play at distance.
🛡️ Fighting against: Use better mobility to make them miss. Target the exposed ammo rack to stop it from firing.
Stronger than: FV107, Coyote, LAV III, Stryker, AAVP, LAV-25, ASLAV, LAV 6, FV510 Equal to: M1128, ZTD-05 Weaker than: Tanks, Bradley
Infantry Fighting Vehicles (IFVs)
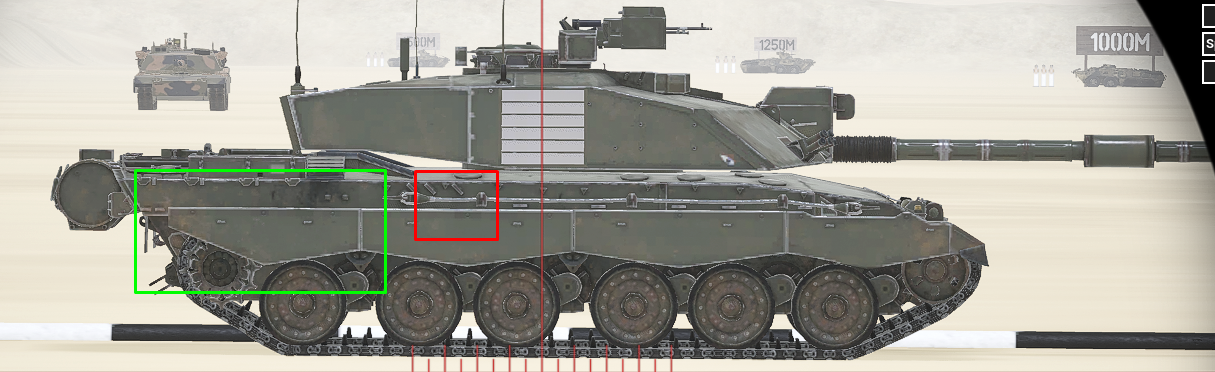
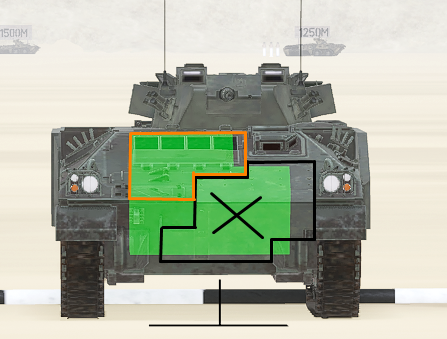
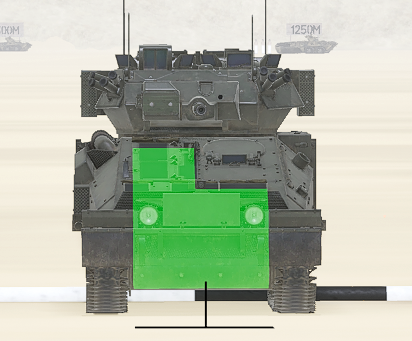
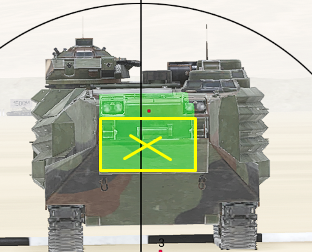
🔵 M2A3 Bradley (USA)
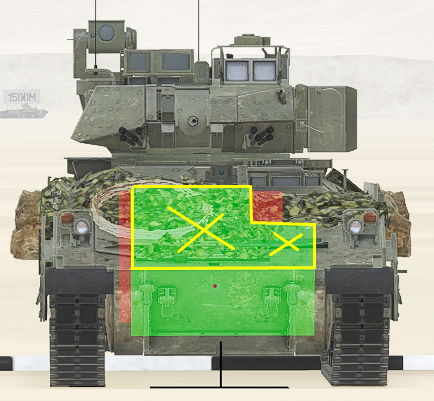
HP: 2000
The old reliable Bradley - a US war machine. Well armored and equipped with TOW capable of 1 HTK on T-72 and ZTZ ammo racks from the front.
⚔️ Fighting as: Face anyone. Just beware of being surprised since tracks are slow. Experienced crews can go for tanks too.
🛡️ Fighting against: Try to surprise this monster. You cannot hit the ammo rack from the front. Engine can only be hit on the lower body. Tracks protect the lower components.
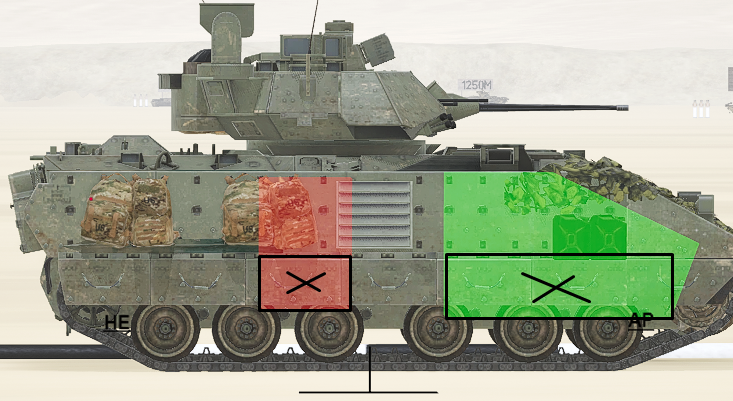
Stronger than: Everything except tanks
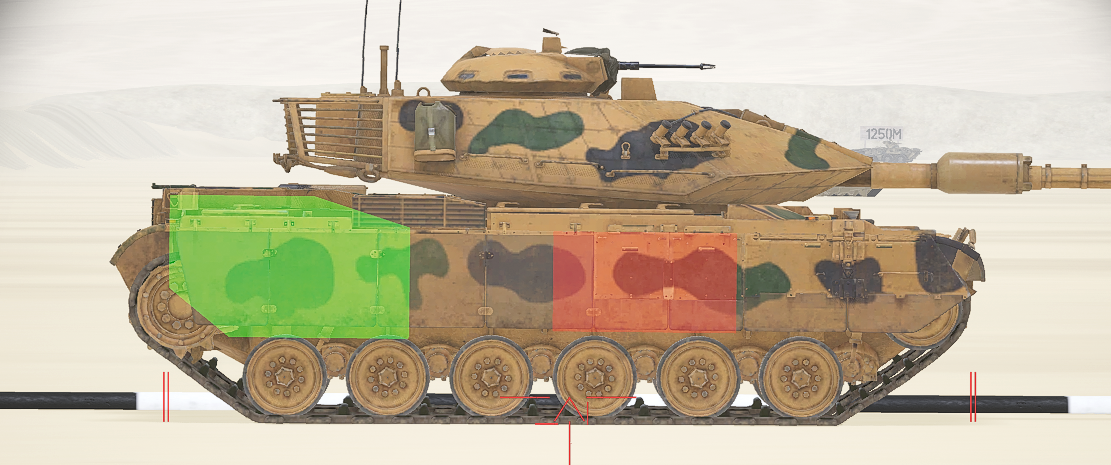
🔵 FV510 Warrior (UK)
HP: 2000
A strong IFV with powerful armor but slower fire rate than the FV520.
⚔️ Fighting as: Face most IFVs with your front. Be careful moving - no stabilization.
🛡️ Fighting against: Avoid frontal engagements. Disable engine and evaluate the fight.
Note: The UA version has armor improvements. The normal version can be penetrated anywhere on the side.
Stronger than: BMP-1, BTR, MTLB-6MB, ACV-15, PARS III Equal to: BMP-2, ZBD-04 Weaker than: ZTD-05, Sprut, HJ-73C variants
🔵 FV107 Scimitar (UK)
HP: 750
The Sniper - basically a paper box with bad fire rate. Can be taken down by a single AT.
⚔️ Fighting as: Hide on mountains and stay away from infantry and other armor. Snipe from distance.
🛡️ Fighting against: Rush it. Dies quickly even to .50cal when shot in turret.
Equal to: .50cal vehicles Weaker than: Almost everything
🟡 ZBD-04A (China)
HP: 1250
Well-equipped IFV for the Chinese faction.
⚔️ Fighting as: Hide your ammo rack behind the engine. Use TOW to AP combo for max damage.
🛡️ Fighting against: Stay front and right side to consistently hit ammo rack. Cannot hit from side with AP due to extra armor and tracks.
Stronger than: ASLAV, FV107, Coyote, LAV III, M1125, LAV-25, AAVP, ACV-15, PARS III, LAV 6 Equal to: FV510, BMP-2 Weaker than: Bradley
🟡 ZBD-05 HJ-73C (China Navy)
HP: 1250
The HJ-73C variant with combo TOW kit. Unfortunately has bad armor.
⚔️ Fighting as: You can use 2 TOWs simultaneously with precision up to 300m. Use and abuse it.
🛡️ Fighting against: Use speed and info to flank. Jamming the gun or getting close is key.
Equal to: Bradley Weaker than: Tanks
🟡 ZBL-08 HJ-73C (China)
HP: 1250
The Hunter - Same power as its tracked brother but fast as hell.
⚔️ Fighting as: Play as an armor hunter. Being able to output 2000 HP damage in seconds with such speed makes you a huge threat. Information is key.
🛡️ Fighting against: Play with info and catch it lacking. If frontal, aim upper body for more component damage.
Equal to: Bradley Weaker than: Tanks
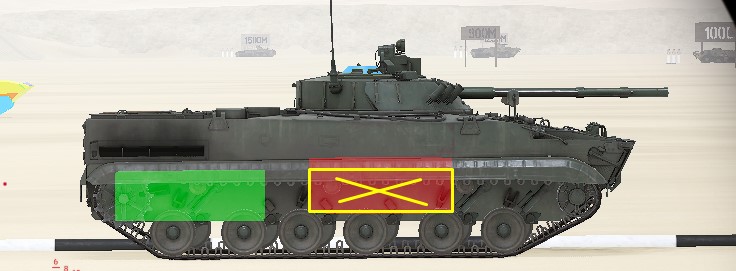
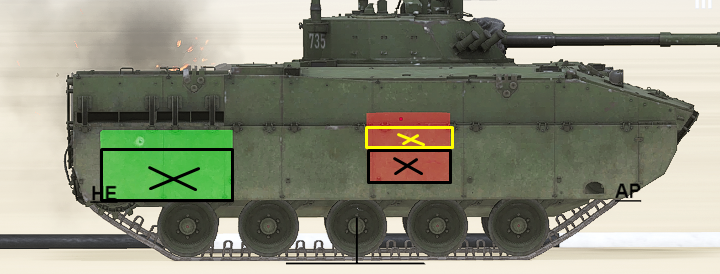
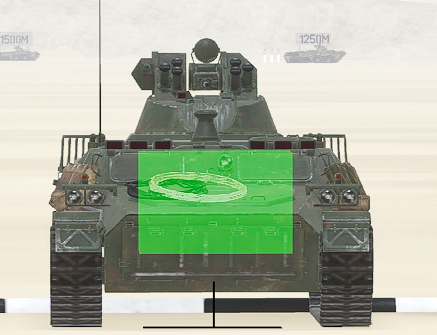
🔴 BMP-2/2M (Russia/MEA)

HP: 1250
The Glass Cannon - RU/MEA’s strongest IFV. Packed with TOWs and amazing fire rate, but only 1250 HP.
The 2M variant has even better firepower: 4 laser-guided TOWs with no reload and a grenade launcher.
⚔️ Fighting as: Use info to be effective with this glass cannon. Played correctly, it can kill most IFVs. Help against MBTs with TOW and good positioning.
🛡️ Fighting against: Disable engine and run close/past it while hitting turret. Close combat disables its TOW.
On the side, aim for the top part so you don’t split component damage with tracks. The 2M variant takes less component damage due to extra armor layer.
Equal to: ZBD-04, FV510 Weaker than: Bradley
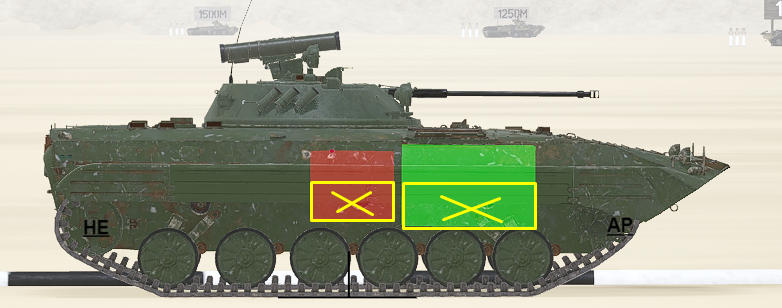
🔴 BMP-1 (Russia/Militia)
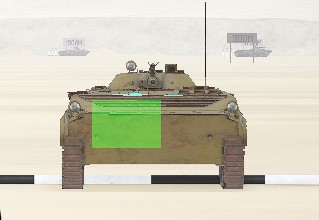
HP: 1250
The “MGS” - The ol’ reliable Russian tool. Can penetrate most tanks and shred IFVs, but has slow movement.
⚔️ Fighting as: Treat it as an MGS. Play to snipe and with information.
🛡️ Fighting against: Disable gun/engine and get close. Projectiles need distance to arm and are useless up close.
Will perform exponentially better with an experienced crew.
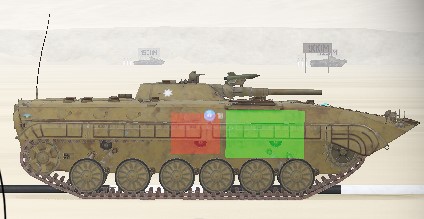
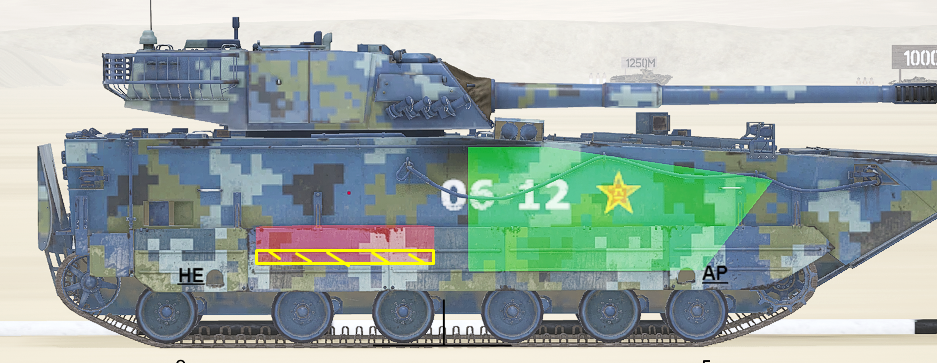
🔴 BMP-3M (Russia)
HP: 1250
An amazing Russian tool packed with almost 200 AP and 300 HE rounds plus 100mm frag shells.
⚔️ Fighting as: Face most IFVs - you have good armor and fire rate. Can snipe other armor with TOW.
🛡️ Fighting against: Flank with info. This has sketchy hitspots for components. With weaker IFVs, just go for the turret.
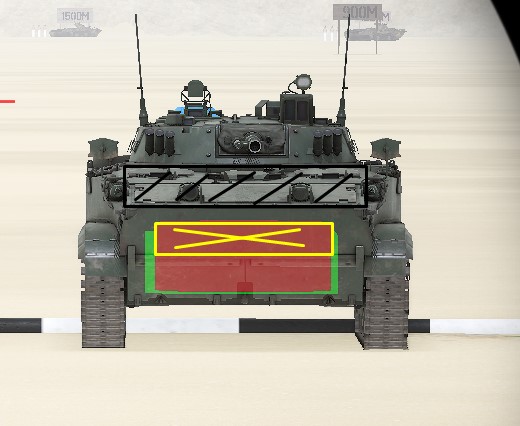
🔴 BMD-4M (Russia VDV)
HP: 1250
Solid IFV but has the same HP issue as BMP-2.
⚔️ Fighting as: Use TOW to AP mechanic and play with info to overcome stronger enemies.
🛡️ Fighting against: Despite high DPS, it has a very exposed ammo rack. Aim for it on front. On sides, hit above the extra armored part.
Equal to: LAV 6 Weaker than: Bradley, FV510, ZBD-04
🔴 BMD-1 (Russia VDV)
HP: 1250
Basically the BMP-1.
⚔️ Fighting as: Play from distance with info. You only have HEAT rounds.
🛡️ Fighting against: Focus turret - it lacks fire rate to kill you fast. Engage first.
🔴 BTR-82A (Russia)
HP: 1000
The fast Russian IFV. Unique for having the engine on the back.
⚔️ Fighting as: Swarm the battlefield with speed. Disable components and go for stronger IFVs’ backs.
🛡️ Fighting against: Go for turret neck ring - reliable damage with no option to hit engine from front.
Stronger than: FV107, Coyote, LAV III, Stryker, LAV-25, AAVP Weaker than: Bradley, FV510, LAV 6, ASLAV, ACV-15
🔴 MT-LB 6MB (Russia/MEA)
HP: 1000
Basically a worse BMP. Same issues but slower due to tracks and exposed engine.
⚔️ Fighting as: Play from distance with info. If encountering another IFV, pray to the fire rate gods.
🛡️ Fighting against: Shutdown the exposed engine and aim above track with explosive for 3x damage.
6MA variants should be treated as APCs - they lack the 30mm cannon.
🔵 ASLAV (Australia)
HP: 1250
The weakest faction IFV-wise.
⚔️ Fighting as: Disable enemy engine and damage gun while going for their back.
🛡️ Fighting against: Shoot anywhere on its engine - it’s pretty weak.
Equal to: BTR-82, MTLB-6MB Weaker than: BMP-2, ZBD-04, HJ-73C, ZTD-05, Sprut
🔵 LAV 6.0 (Canada)
HP: 1750
The main Canadian IFV. Solid but better in duo with another LAV/Coyote due to low ammo.
⚔️ Fighting as: Most layers you’re against better IFVs. Play as a group with other armor.
🛡️ Fighting against: Disable engine, then go for turret and fire at will.
Stronger than: BMP-1, BTR-82, MTLB-6MB, PARS III Equal to: ZBD-04, ACV-15 Weaker than: BMP-2, HJ-73C, Sprut, ZTD-05
🔵 Coyote (Canada)
HP: 1250
Pretty much an ASLAV copy with a smaller engine.
⚔️ Fighting as: Use speed to fly through the map. Duo with a LAV 6 for better results.
🛡️ Fighting against: Disable engine and kill it.
Equal to: PARS III Weaker than: BMP-2, ZBD-04, HJ-73C, ZTD-05, Sprut, BTR-82, ACV-15
🔵 LAV-25 (USMC)
HP: 1250
Copy of Coyote.
⚔️ Fighting as: Use speed to fly through the map. Play with info.
🛡️ Fighting against: Disable engine and kill it.
Stronger than: MTLB-6MB, BMP-1, BMD-1 Equal to: BTR-82 Weaker than: BMP-2, ZBD-04, HJ-73C, ZTD-05, Sprut
🔵 AAVP-7A1 (USMC)
HP: 2000
The Turtle - A moving fortress with .50cal and construction points.
⚔️ Fighting as: Perfect for killing BTRs and infantry. Comes with 600 construction points. Help infantry or play as a safe supply truck.
🛡️ Fighting against: No stabilization - make rounds around it and disable engine.
🔵 M1125 Stryker (USA)
HP: 1250
US main IFV has a .50cal? Yes, and it goes head-to-head against the BTR-82.
⚔️ Fighting as: Be careful who you’re playing against. Use info - shooting first is important as the gun heats up.
🛡️ Fighting against: Remove mobility ASAP. Destroy engine and keep shooting. The .50cal cannot damage components of most IFVs.
Equal to: BTR-82 Weaker than: ZTD-05, Sprut, BMP-2, ZBD-04, MTLB-6MB, HJ-73C, PARS III, ACV-15
🔵 Bulldog APC (UK)
HP: 2000
Not much you can do except kill infantry. The RWS (closed) variant does no damage to armor.
⚔️ Fighting as: Play with info and help other stronger armored vehicles. You’re support.
🛡️ Fighting against: Kill exposed gunner then disable engine.
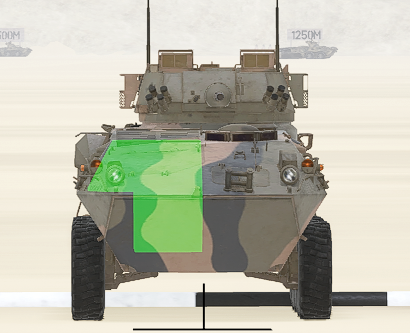
🟢 ACV-15 (Turkey)
HP: 1250
Pretty mediocre IFV. Lacks extra armor, is slow, and has no TOW available.
⚔️ Fighting as: You can’t do much. Help infantry and engage armor with info.
🛡️ Fighting against: Hit engine and go for turret. Easy kill. From front, hit the lights or lower body.
🟢 PARS III (Turkey)
HP: 1250
The Meme - Shouldn’t even be on this list. Takes 3x damage from explosive ammo to wheels and back.
⚔️ Fighting as: Use speed in your favor. Avoid frontal engagements.
🛡️ Fighting against: Face it frontally or easy kill with explosives on wheels/back.